Using MediaFiles in Django
Using media files in Django involves handling user-uploaded content such as images, videos, and other files. Here’s a step-by-step guide to setting up
Using media files in Django involves handling user-uploaded content such as images, videos, and other files. Here’s a step-by-step guide to setting up and using media files in a Django project.
Scenario: Handling Media Files in Django
Step 1: Configure Settings
Open your
settings.pyfile and add the following lines:# settings.py MEDIA_URL = '/media/' MEDIA_ROOT = BASE_DIR / "media"
Step 2: Create Media Directory
In your project root, create a
mediadirectory:my_project/ ├── my_app/ ├── media/ # THIS ONE ├── static/ ├── manage.py └── settings.py
Step 3: Create a Model to Handle Media Files
Define a model that includes a
FileFieldorImageFieldinmy_app/models.py:# my_app/models.py from django.db import models class UserProfile(models.Model): username = models.CharField(max_length=100) profile_picture = models.ImageField(upload_to='profile_pictures/') def __str__(self): return self.username
pip install pillow
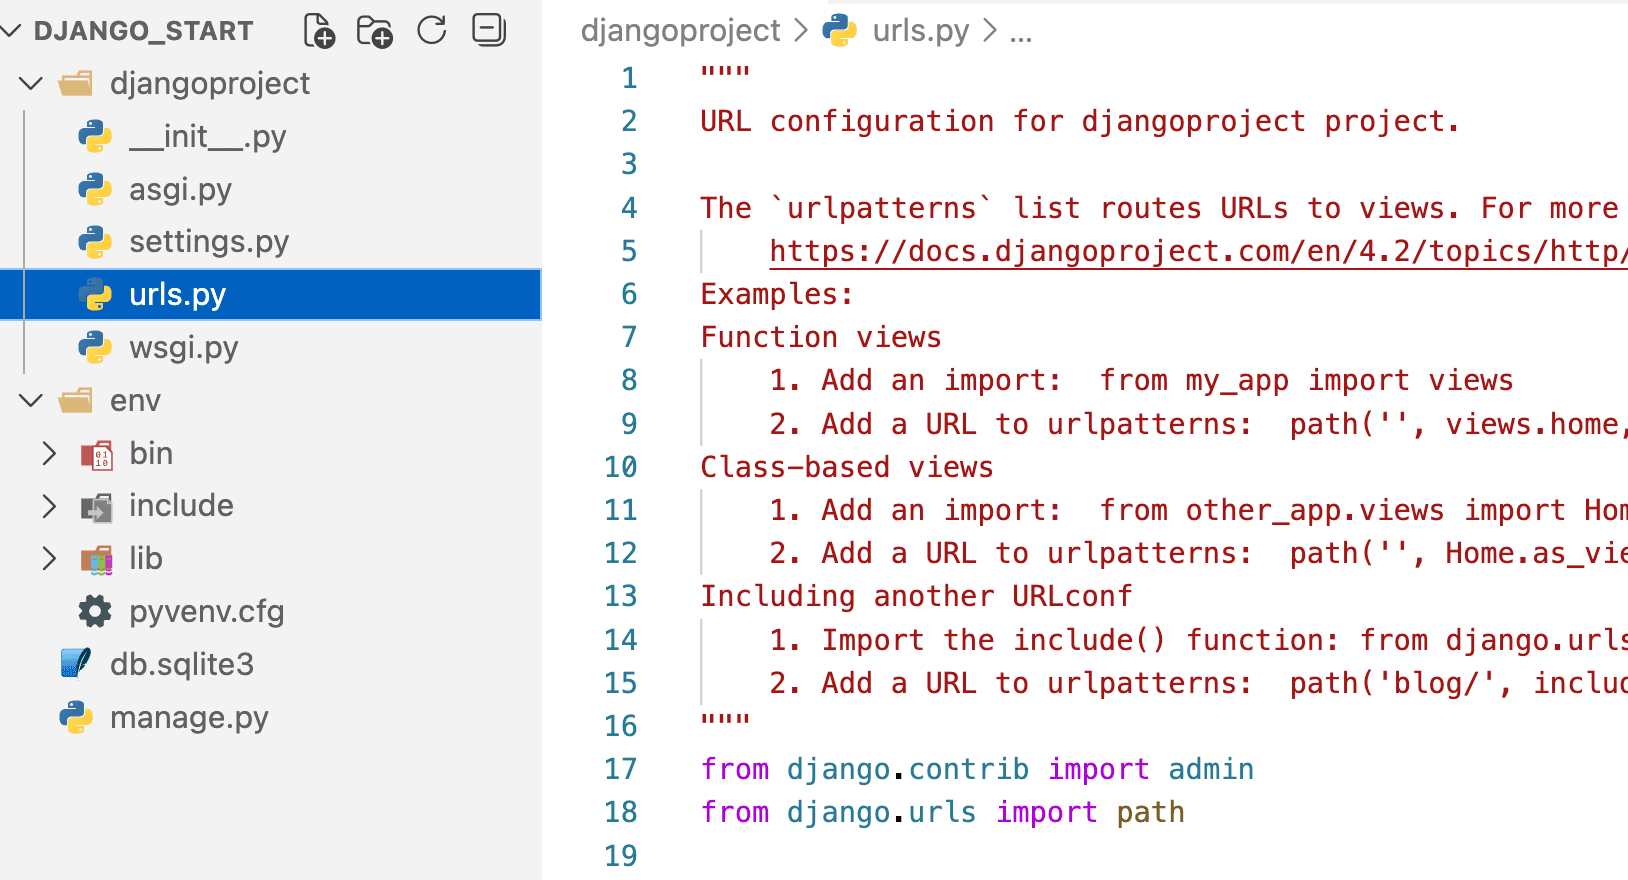
Step 4: Configure URLs
Add a URL pattern to serve media files during development in
my_project/urls.py:# my_project/urls.py from django.contrib import admin from django.urls import path, include from django.conf import settings from django.conf.urls.static import static urlpatterns = [ path('admin/', admin.site.urls), path('', include('my_app.urls')), ] if settings.DEBUG: urlpatterns += static(settings.MEDIA_URL, document_root=settings.MEDIA_ROOT)
Step 5: Create a Form to Upload Media Files
Create a form for uploading media files in
my_app/forms.py:# my_app/forms.py from django import forms from .models import UserProfile class UserProfileForm(forms.ModelForm): class Meta: model = UserProfile fields = ['username', 'profile_picture']
Step 6: Create a View to Handle the Form
Create a view to handle file uploads in
my_app/views.py:# my_app/views.py from django.shortcuts import render, redirect from .forms import UserProfileForm def upload_profile(request): if request.method == 'POST': form = UserProfileForm(request.POST, request.FILES) if form.is_valid(): form.save() return redirect('profile_list') else: form = UserProfileForm() return render(request, 'my_app/upload_profile.html', {'form': form}) def profile_list(request): profiles = UserProfile.objects.all() return render(request, 'my_app/profile_list.html', {'profiles': profiles})
Step 7: Create Templates
Create the template for uploading files (
my_app/templates/my_app/upload_profile.html):<!DOCTYPE html> <html lang="en"> <head> <meta charset="UTF-8"> <meta name="viewport" content="width=device-width, initial-scale=1.0"> <title>Upload Profile</title> </head> <body> <h1>Upload Profile</h1> <form method="post" enctype="multipart/form-data"> {% csrf_token %} {{ form.as_p }} <button type="submit">Upload</button> </form> </body> </html>Create the template for displaying the list of profiles (
my_app/templates/my_app/profile_list.html):<!DOCTYPE html> <html lang="en"> <head> <meta charset="UTF-8"> <meta name="viewport" content="width=device-width, initial-scale=1.0"> <title>Profile List</title> </head> <body> <h1>Profile List</h1> <ul> {% for profile in profiles %} <li> <img src="{{ profile.profile_picture.url }}" alt="{{ profile.username }}" width="100"> {{ profile.username }} </li> {% endfor %} </ul> </body> </html>
Step 8: Create URLs for the Views
Define URLs for the views in
my_app/urls.py:# my_app/urls.py from django.urls import path from .views import upload_profile, profile_list urlpatterns = [ path('upload/', upload_profile, name='upload_profile'), path('', profile_list, name='profile_list'), ]
Step 9: Run the Development Server
Run the development server:
python manage.py runserverOpen a web browser and navigate to
http://127.0.0.1:8000/upload/to upload a profile picture.Navigate to
http://127.0.0.1:8000/to see the list of profiles with their uploaded pictures.
This setup allows you to handle media files in your Django project, including uploading files, saving them to the file system, and displaying them on your website.