Esp8266 Wifi Bot
Here’s a clear and well-structured documentation for your ESP8266 WiFi Robot Car project that includes setup, features, code explanation, and troubleshooting.
🚗 ESP8266 WiFi Robot Car (AP Mode + Web UI)
This project allows you to control a robotic car using an ESP8266 via a WiFi Access Point (AP).
It serves a web interface with large directional buttons that send motion commands to the ESP8266.
📘 Overview
When powered, the ESP8266 creates its own WiFi network (ESP8266_Robot_Car).
A user connects to this WiFi and opens a webpage (usually at http://192.168.4.1).
The page contains four big buttons:
↑ Forward
↓ Backward
← Left
→ Right
When a button is pressed, a command (F, B, L, or R) is sent to the ESP8266.
When the button is released, a stop (S) command is sent.
⚙️ Hardware Requirements
| Component | Quantity | Description |
| ESP8266 (NodeMCU / Wemos D1 Mini) | 1 | Main microcontroller with WiFi |
| L298N or L293D Motor Driver | 1 | To control DC motors |
| DC Motors | 2 | For car movement |
| Power Source | 1 | 7.4V–12V battery pack |
| Jumper Wires | — | For connections |
🪛 Wiring Diagram
| ESP8266 Pin | Motor Driver Pin | Description |
| D1 | IN1 | Motor A forward |
| D2 | IN2 | Motor A backward |
| D3 | IN3 | Motor B forward |
| D4 | IN4 | Motor B backward |
| 5V / Vin | VCC | Power to driver |
| GND | GND | Common ground |
You can change pin assignments in the code if needed.
💻 Software Setup
1. Install Requirements
Install Arduino IDE
Add the ESP8266 board package
(File → Preferences → Additional Boards Manager URLs)https://arduino.esp8266.com/stable/package_esp8266com_index.jsonInstall required libraries:
ESP8266WiFi.hESP8266WebServer.h
2. Upload Code
Copy the full sketch provided.
Select your ESP board from Tools → Board.
Select the correct COM port.
Click Upload.
🌐 Connecting to the Car
After upload, open the Serial Monitor at
115200 baud.You should see something like:
 🚀 Starting ESP8266 Robot Car in AP Mode...
 📶 Access Point Started. IP: 192.168.4.1
 🌐 HTTP Server Started!
On your phone or laptop:
Go to WiFi settings
Connect to
ESP8266_Robot_Car
Password:12345678Open browser and visit:
http://192.168.4.1
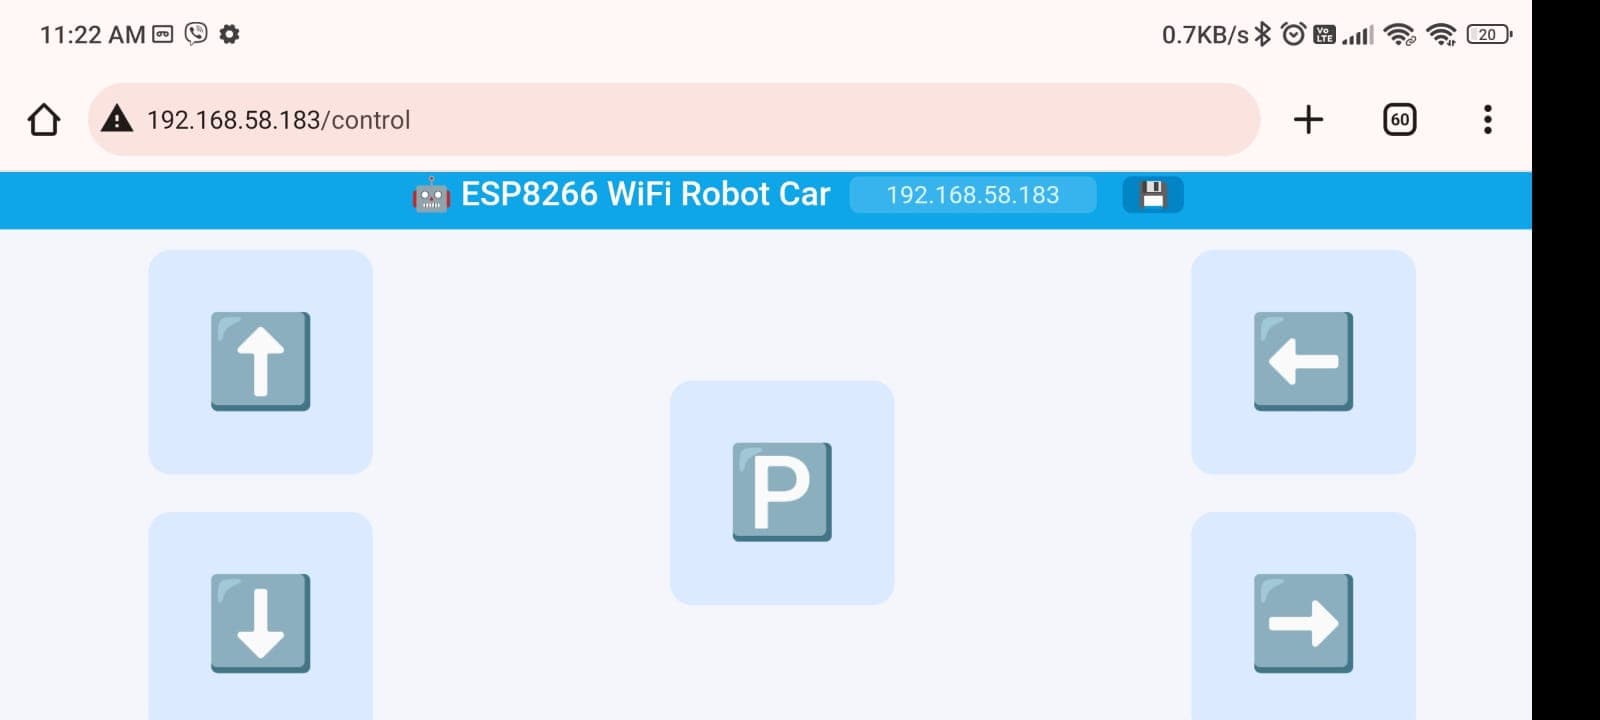
You’ll see a control interface with four large buttons.
🧭 Web Interface Features
Responsive Layout – works on mobile and desktop in landscape mode.
Editable IP field – you can change IP if needed.
LocalStorage support – remembers the IP address even after reload.
Touch & Mouse Events – supports both mobile and desktop controls.
⚡ Command Mapping
| Command | Description |
F | Move Forward |
B | Move Backward |
L | Turn Left |
R | Turn Right |
S | Stop |
Each command is sent as an HTTP GET request to:
http://192.168.4.1/control?state=<COMMAND>
Example:
http://192.168.4.1/control?state=F
🪵 Debugging via Serial Monitor
Serial outputs help you see what’s happening:
➡️ Received command: F
🚗 Moving Forward
➡️ Received command: S
⏹ Stopping Car
If you don’t see this, check:
Power supply to the ESP8266 and motor driver
Correct pin wiring
Serial Monitor baud rate (115200)
🧩 Code Overview
Main Components:
WiFi.softAP() – Starts ESP8266 in Access Point mode
ESP8266WebServer server(80) – Runs HTTP server on port 80
server.on("/", handleRoot) – Serves the control webpage
server.on("/control", handleControl) – Handles motion commands
Motor Functions:
forward(),backward(),left(),right(),stopCar()
Flow:
User connects to AP
Loads control page
Presses button → JavaScript sends HTTP request
ESP8266 receives request and activates motor pins
🧠 Troubleshooting
| Issue | Possible Cause | Solution |
| Page not loading | Wrong IP or disconnected WiFi | Reconnect to ESP8266_Robot_Car and try 192.168.4.1 |
| Buttons not working | Wrong pin mapping | Check motor pin assignments |
| Car not stopping | No S command | Ensure button release is detected |
| No serial output | Wrong baud rate | Set Serial Monitor to 115200 baud |
🧩 Future Improvements
Add Station Mode (STA) support to control from existing WiFi network.
Add Speed Control (PWM) for smooth movement.
Add Camera streaming support.
Use OTA updates for easy firmware upgrades.
🏁 Summary
✅ Standalone WiFi-controlled robot car
✅ Easy-to-use web UI hosted directly on ESP8266
✅ Real-time control using touch or mouse
✅ Fully customizable and expandable
Code
#include <ESP8266WiFi.h>
#include <ESP8266WebServer.h>

// Motor pin definitions (change as per your wiring)
#define IN1 D1
#define IN2 D2
#define IN3 D3
#define IN4 D4

ESP8266WebServer server(80);

// HTML Page (embedded)
const char MAIN_page[] PROGMEM = R"rawliteral(
<!DOCTYPE html>
<html lang="en">
<head>
  <meta charset="UTF-8" />
  <meta name="viewport" content="width=device-width, initial-scale=1.0">
  <title>ESP8266 WiFi Robot Car</title>
  <style>
    body {
      margin: 0;
      background: #f4f6fb;
      font-family: Arial, sans-serif;
      display: flex;
      flex-direction: row;
      justify-content: space-around;
      align-items: center;
      height: 100vh;
      overflow: hidden;
    }

    .panel {
      display: flex;
      flex-direction: column;
      justify-content: center;
      gap: 20px;
    }

    .arrow-btn {
      width: 120px;
      height: 120px;
      border: none;
      border-radius: 12px;
      background: #dbeafe;
      display: flex;
      justify-content: center;
      align-items: center;
      font-size: 48px;
      color: #1e3a8a;
      transition: 0.2s;
    }

    .arrow-btn:active {
      background: #93c5fd;
      transform: scale(0.95);
    }

    .arrow-btn.active{
        background: #93c5fd;
        transform: scale(0.95);
    }

    .center-panel {
      display: flex;
      flex-direction: column;
      align-items: center;
      gap: 15px;
    }

    .info-bar {
      position: absolute;
      top: 0;
      left: 0;
      width: 100%;
      background: #0ea5e9;
      color: white;
      text-align: center;
      padding: 8px;
      font-size: 18px;
      font-weight: 500;
      display: flex;
      justify-content: center;
      align-items: center;
      gap: 10px;
    }

    .status {
      font-size: 14px;
      opacity: 0.85;
    }

    #editIp {
      background: none;
      border: none;
      color: white;
      font-size: 16px;
      cursor: pointer;
    }

    #ipInput {
      background: rgba(255, 255, 255, 0.2);
      border: none;
      border-radius: 5px;
      padding: 2px 6px;
      color: white;
      width: 120px;
      text-align: center;
    }

    #saveBtn {
      background: #0284c7;
      border: none;
      color: white;
      border-radius: 5px;
      padding: 2px 8px;
      cursor: pointer;
      margin-left: 4px;
    }
  </style>
</head>
<body>
  <div class="info-bar">
    🤖 ESP8266 WiFi Robot Car
    <span class="status">
      <input id="ipInput" value="192.168.4.1">
    </span>
    <button id="saveBtn">💾</button>
  </div>

  <div class="panel">
    <button class="arrow-btn" id="forward">⬆️</button>
    <button class="arrow-btn" id="backward">⬇️</button>
  </div>

  <div class="center-panel">
    <button class="arrow-btn" id="stop">🅿️</button>
  </div>

  <div class="panel">
    <button class="arrow-btn" id="left">⬅️</button>
    <button class="arrow-btn" id="right">➡️</button>
  </div>

  <script>
    // Load saved IP from localStorage or set default
    let baseIP = localStorage.getItem("robot_ip") || "192.168.4.1";
    const ipInput = document.getElementById("ipInput");
    const saveBtn = document.getElementById("saveBtn");
    ipInput.value = baseIP;

    // Save new IP to localStorage
    saveBtn.addEventListener("click", () => {
      baseIP = ipInput.value.trim();
      if (baseIP) {
        localStorage.setItem("robot_ip", baseIP);
        alert(`✅ IP saved: ${baseIP}`);
      }
    });

    function sendState(state) {
      const url = `http://${baseIP}/control?state=${state}`;
      fetch(url).catch(err => console.log("Request failed:", err));
    }

    function addControlEvents(id, code) {
      const btn = document.getElementById(id);
      const press = () => sendState(code);
      const release = () => sendState("S");

      btn.addEventListener("mousedown", press);
      btn.addEventListener("mouseup", release);
      btn.addEventListener("mouseleave", release);

      // Mobile/touch support
      btn.addEventListener("touchstart", e => { e.preventDefault(); btn.classList.add("active"); press(); });
      btn.addEventListener("touchend", e => { e.preventDefault(); btn.classList.remove("active"); release(); });
    }

    addControlEvents("forward", "F");
    addControlEvents("backward", "B");
    addControlEvents("left", "L");
    addControlEvents("right", "R");

    // Stop button
    document.getElementById("stop").addEventListener("click", () =>{ sendState("S")});
  </script>
</body>
</html>
)rawliteral";

void setup() {
  Serial.begin(115200);
  Serial.println();
  Serial.println("🚀 Starting ESP8266 Robot Car in AP Mode...");

  // Setup motor pins
  pinMode(IN1, OUTPUT);
  pinMode(IN2, OUTPUT);
  pinMode(IN3, OUTPUT);
  pinMode(IN4, OUTPUT);
  stopCar();

  // Start Access Point
  WiFi.softAP("ESP8266_Robot_Car", "12345678");
  Serial.print("📶 Access Point Started. IP: ");
  Serial.println(WiFi.softAPIP());

  // Route handlers
  server.on("/", handleRoot);
  server.on("/control", handleControl);
  server.begin();
  Serial.println("🌐 HTTP Server Started!");
}

void loop() {
  server.handleClient();
}

// Serve the control UI
void handleRoot() {
  Serial.println("📄 Client requested index page");
  server.send(200, "text/html", MAIN_page);
}

// Handle motor control requests
void handleControl() {
  if (!server.hasArg("state")) {
    Serial.println("⚠️ No state argument received!");
    server.send(400, "text/plain", "Missing state parameter");
    return;
  }

  String state = server.arg("state");
  Serial.print("➡️ Received command: ");
  Serial.println(state);

  if (state == "F") forward();
  else if (state == "B") backward();
  else if (state == "L") left();
  else if (state == "R") right();
  else if (state == "S") stopCar();
  else Serial.println("❌ Invalid state command!");

  server.send(200, "text/plain", "OK");
}

// Motor Control Functions
void forward() {
  Serial.println("🚗 Moving Forward");
  digitalWrite(IN1, HIGH);
  digitalWrite(IN2, LOW);
  digitalWrite(IN3, HIGH);
  digitalWrite(IN4, LOW);
}

void backward() {
  Serial.println("🚗 Moving Backward");
  digitalWrite(IN1, LOW);
  digitalWrite(IN2, HIGH);
  digitalWrite(IN3, LOW);
  digitalWrite(IN4, HIGH);
}

void left() {
  Serial.println("↩️ Turning Left");
  digitalWrite(IN1, LOW);
  digitalWrite(IN2, HIGH);
  digitalWrite(IN3, HIGH);
  digitalWrite(IN4, LOW);
}

void right() {
  Serial.println("↪️ Turning Right");
  digitalWrite(IN1, HIGH);
  digitalWrite(IN2, LOW);
  digitalWrite(IN3, LOW);
  digitalWrite(IN4, HIGH);
}

void stopCar() {
  Serial.println("⏹ Stopping Car");
  digitalWrite(IN1, LOW);
  digitalWrite(IN2, LOW);
  digitalWrite(IN3, LOW);
  digitalWrite(IN4, LOW);
}